Want to build your own BBQ smoker trailer from scratch? In this guide, our goal is to organize everything you need to make your dream smoker in one convenient location. Within this “ultimate guide” you’ll find step-by-step video instructions on how to go about welding your own smoker, the tools and equipment you’ll need to own or get access to, and some free blueprint plans you can download right now and use for inspiration. Let’s do this!
Before we dive straight into the instruction there’s an important safety points we must make. Building your own BBQ smoker from scratch requires some intermediate welding skills. You don’t need to be a Jedi welder to pull this stuff off, but this should not be your first welding project either. You can sustain severe injuries if you make a mistake welding. If you’re not an experienced welder, get an experienced professional to help you out or find a reputable builder if you want something that is custom made. Now that we’ve got the disclaimers out of the way, let’s dive right into to equipment and tools you’ll need to complete this project.
Page Contents
Equipment Checklist
Open Air Utility Trailer – You will need the a trailer to attach your smoker to. For most folks, a 5×10 foot trailer is more than enough space to install a 120 gallon tank and leave some space for optional items or nice to have features that we will describe in more detail below. Most builders report spending between $1,000 – $2,000 on a used trailer depending on the size and condition.
If you plan to keep your BBQ trailer on-site at your property and don’t intend to travel frequently with it then you can cut costs and get a cheaper trailer. If you do plan to take this off-site to family gatherings or catering gigs you will need something that is more road-worthy and can handle the mileage. If you want to go really big and leave plenty of room for extras, we recommend investing in a 16-foot trailer. You can “go wild” with adding special features at this size.
Propane Tank – Within the video series below, you’ll see a 60 gallon propane tank that is modified to become a 100+ gallon tank. This propane tank will become what is commonly referred to as the smoking chamber. This probably goes without saying, but the larger the propane tank the more meats you’ll be able to cook at once. The larger the tank you install, the bigger the trailer you’ll need to lug this thing around and support the weight. If you want to keep costs low, start with a smaller 60-gallon propane tank and even a small trailer will do the job. Stretch was able to purchase this propane tank for about $20 at a scrap yard. This can be a cost-effective option for you as well if you’re looking to get this project done on a tight budget.
Another standard size for a propane tank is 120 gallons. You can purchase a 120 gallon tank for under $1,000. This article has some more detailed information about pricing for different propane tanks.
Chimney – The chimney is needed to release heat and smoke from the main chamber of your smoker. Smaller smokers using 60-gallon tanks will usually only have one chimney. For larger 120 gallon and larger tanks, it’s recommended to install two chimneys. One on the right and left side to ensure the heat has somewhere to go. You can use scrap metal to form the chimney or exhaust.
Steel Racks – You will need some racks to place the meat inside of the smoker. It’s recommended that you install these racks on tracks inside the BBQ so that you can easily pull them out when needed. It will make operating a BBQ much easier and more convent. These are sometimes referred to as cooking grates or BBQ grids. You can order these in a variety of different dimensions pre-made at places like TheBBQDepot.com.
Firebox – The firebox is where the heat or fire is made. You need to install this firebox because you don’t want the fire to be directly over your meat in the main chamber as it would be within a regular BBQ grill. The goal is for the heat from the firebox to circulate around in the main chamber and smoke the meat evenly.
Steel Wood Boxes – You don’t need to install steel boxes on your BBQ trailer, but they sure are nice to have! Many builders will install some steel boxes into the trailer that can be used in a variety of ways. One common use is to place wood logs for smoking later in these boxes. Other pit masters make their boxes the right size to fit their Igloo coolers in here where meat and beverages can remain cool.
Cutting Board Area – The cutting board area will only consume a small portion of your trailer if you decide to install it, but will make cutting meats and prep easier for the pitmaster. We recommend installing a low-cost cutting plastic cutting board like this one from Winco. These boards are affordable and can be easily replaced if you get too much wear and tear.
Roof or Awning – This is another optional feature. Many of the smaller BBQ trailers that are used for tailgating don’t have a roof and get by just fine. Installing a roof or awning will have a couple major benefits. First, your smoker will be covered and better protected from rain. This can also protect your smoker from prolonged exposure to the sun. A roof or awning can also provide benefits for the cook too. If you don’t like standing in the sun all day long this is a feature you’ll want included.
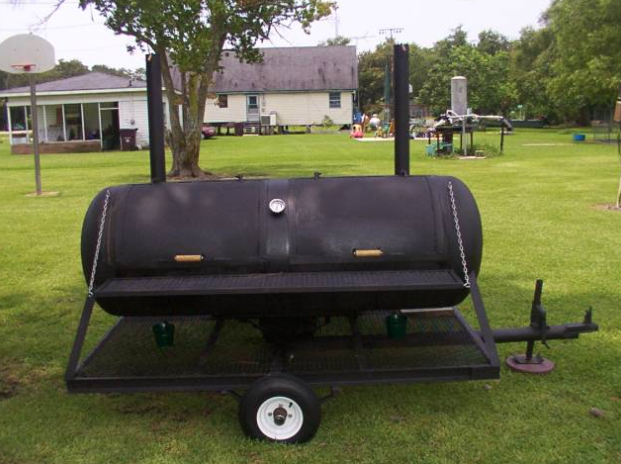
You can build a BBQ smoker like this.
Tools You’ll Need to Build a BBQ Smoker:
- Welder
- Welding helmet / mask
- Welding gloves
- Circular saw
- Steel Cutting blade
- Steel racks
- Hammer
Other Considerations:
In addition to the considerations listed above there’s a few other items you need to keep in mind depending on how you plan to use your future trailer. If your goal is to smoke burgers, steaks, and hotdogs in the backyard with your friends then feel free to ignore this section. However, if your goal is to turn this into a catering business or food trailer business read-on because this section will be critically important.

If you plan to use your BBQ smoker to start a catering business, you will need to build in some additional elements built into your trailers to meet state, county, and potentially city health requirement regulations. If you do want to start this as a business, consult your state and local health department for mobile food vending before you start the design process. The local laws in your area will likely influence how your trailer is made. For example, many jurisdictions will require that you have hot + cold water and a 3-compartment sink installed on the trailer to meet safety requirements. If your trailer does not meet this requirement you won’t be able to vend legally in that area. As you might imagine adding things like a sink, plumbing, and water storage adds an extra element of complexity of your build out. Bottom line, you need to know the local laws of the land before you build if you wan to turn this into a business venture and not just a fun project.
Finally, we encourage you to build a plan and create a blue-print for your BBQ trailer before you start purchasing equipment for the build. For example, you may find a propane tank to convert into your main chamber for an affordable price, but if your trailer isn’t big enough you won’t be able to use it. Start with the plan and move onto purchasing equipment next.
Download Now: Free BBQ Trailer Blueprint PDF
BBQ Smoker Plans – Download this free blue-print for building your own BBQ trailer. This is available in a PDF document that you can save to your computer.
The BBQ Smoker Build Process: Step By Step
Step 1: Create a Blueprint and Frame the Trailer
Before you pull out your wallet and invest in a bunch of equipment, make sure you have a clear idea about what you want to build. Most people purchase an open air utility trailer first. Think about the utility trailer as the frame or the foundation that you will build your trailer on. After you know how much room you have to work with on a trailer you can begin to map out what you need and where you want to position things on your trailer.
You won’t need anything fancy to map out your trailer build. Most folks can jot down the specs on a simple piece of paper and a pen. You can also use a calculator like Feldon’s BBQ Pit Calculator here to help you build out these specs.
Step 2: Build Main Chamber
In video one of this series, Stretch cuts a 60-gallon propane tank “hot-dog style” to create the top and bottom of the main chamber. Stretch uses a circular saw and cutting blade to get through the steel tank. Later in the series the tank will be modified further to become a larger smoking chamber for the unit. By the end of this video, we have the top and bottom sections of the smoker’s main chamber.
Step 3: Finding The Right Pieces
In video two, we tag along for the ride in Stretches Silverado and head out to the scrap metal yard. Here Stretch is going to look for everything you need to build a BBQ trailer. Stretch picks up metal for the reverse flow plate, expanded metal that will be used for the grate, four-inch channel will be used for the frame and the tongue of the trailer was also salvaged. Watch Stretch starting putting this trailer together in the next 15 minutes.
Step 4: Building the Firebox
Time to cut a door into the firebox. As the name implies, the firebox is where you will get your heat. You will insert wood in here or coal depending on your preference. You also need to make sure there’s proper airflow from the firebox to the main chamber. You will need to install a door to open and close this area as demonstrated within this video.
Step 5: Putting Everything Together
Once you’ve got your firebox and main chamber assembled, the only thing left is to weld the two pieces together and put them onto a trailer. That’s exactly what you’ll learn to do in this video!
Step 6: Making Sure Everything is Weighted Correctly
After a short, but entertaining break for the first 60 seconds of this video we get back to the build. The firebox, which weighs about 160 pounds is now installed at the rear of the trailer. When assembling a trailer like this you need to be aware of your weight distribution. You don’t want too much weight in the rear or the front of the trailer or transporting the smoker won’t work. There are some tricks you can use to even out the weight though. In this case, Stretch will be putting concrete at the toungue of the trailer to distribute the weight properly.
Step 7: Painting the BBQ and Other Finishing Touches
Here we are at the final step of our build process. In step 7, Stretch welds some finishing touches of the BBQ panels and hammers open the door. Finally, some black paint gets sprayed on the trailer and the job is complete.
Looking for More Inspiration?
Looking for other examples of builds? Check out the resources listed below to see how other folks have built their own BBQ.
How to Build a Food Truck Yourself – We break down the steps needed to build your own mobile food unit.
Build 250 Gallon Reverse Flow Smoker – See the process of building a large smoker trailer.
BBQ Trailer for Food Vending – Nice series on the topic of starting a BBQ trailer that you could use for a business.
BBQ Trailer Build Forum – SmokingMeatForums.com is an awesome place to see serious grillers from around the world that have built their own BBQ trailers out of their garage. Awesome community to learn about BBQ as well.


